
Forums › Laser Treatment Tips and Techniques › Hard Tissue Procedures › Crown Preps, Revisited
- This topic is empty.
-
AuthorPosts
-
2thlaserSpectatorHey Everyone,
Sorry I haven’t posted much recently. As some of you know, I am in teaching mode, and really haven’t been documenting cases as of late.I have started some newer techniques since Nov, 2002 thread on smoother crown preps, mostly by dissecting the peripheral rim of enamel, and utilizing the end cutting nature of the laser to my advantage. Interestingly enough, the more I do, and I do quite a few, the better the procedure seems to be going, and quicker too. When I look back at the old posts from almost 2 years ago, I am amazed at how much I have learned from using the laser consistently, and constantly. I preach that PATIENCE + PERSISTENCE= PROFICIENCY in my lectures, and in addition, reading everyone’s posts here, and learning is so very important. I hope that as we elevate the standard of care in denistry, we will all look back on our contributions, all of us, and be proud of what and where we have come from. When I compare what Bob Gregg, Bob Barr, Stu, Glenn, Ron’s, David, Kelly’s and the rest of the gang do, and where they have come from, I am truely excited about where our profession and lasers are going! Thanks a bunch to all of you who PARTICIPATE in this forum, and again to RON SHALTER, who is one of my many mentors, for starting this for us all.
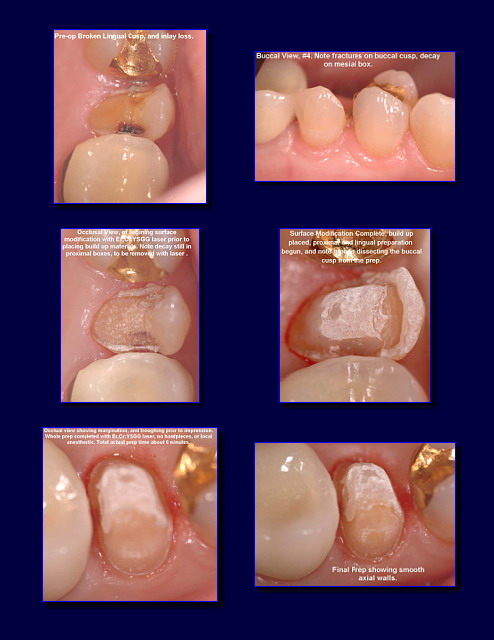
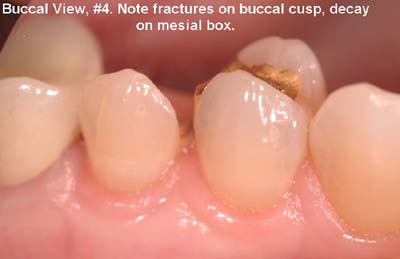
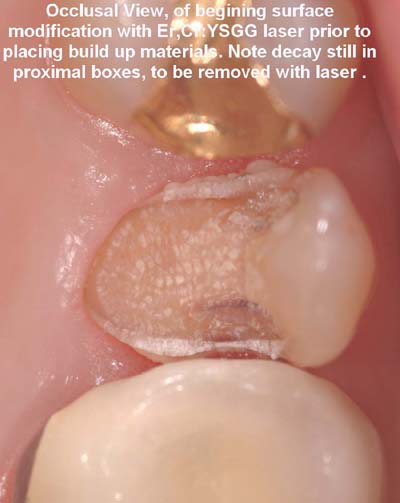
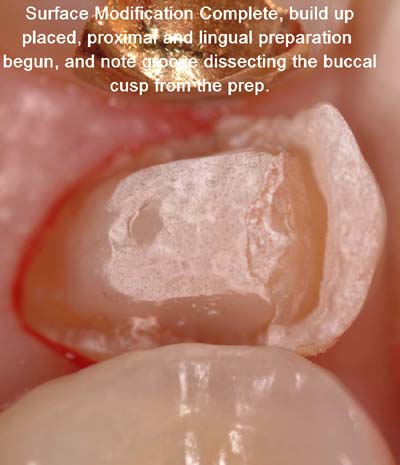
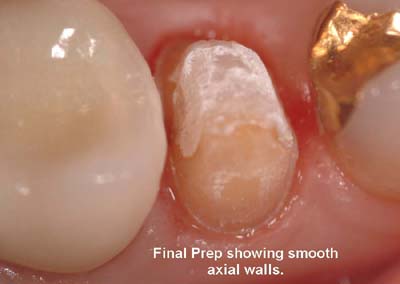
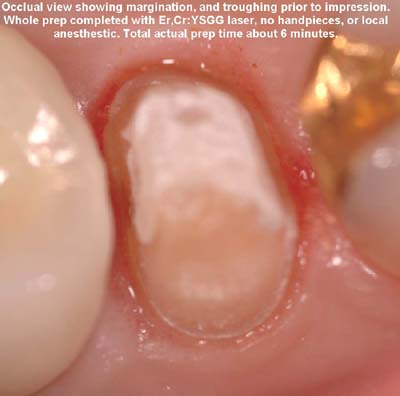
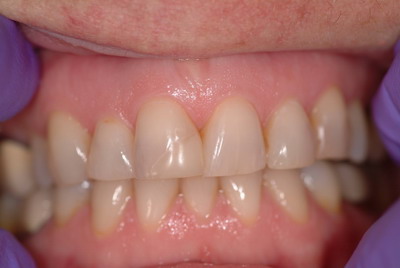
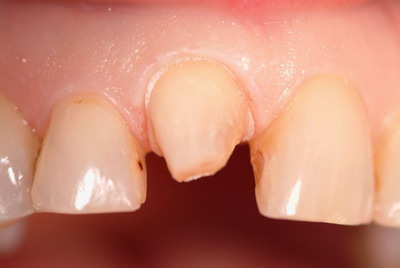
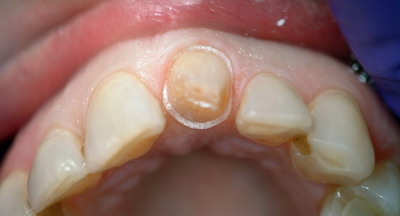
Here’s the case: It’s my wife’s adopted mother, very similar to the very first case I published in Oct, 2002. With knowlege, comes wisdom, and using what I have learned, I think the preps are looking much better. One of the things I do differently is my water and air settings are WAY down, to 60%air, 30%water, I still use the 5.5W Anesthesia technique, defocussed at 10 mm for 90 seconds, then I do gross reduction at 5.5-3.5W depending on what I OBSERVE using 6.0x loupes. YOU NEED MAGNIFICATION for laser dentistry, right Glenn ;)?
I use lower settings for margnination…..
I have the photo of the crown seat somewhere, just gotta locate it. By the way, I teach this at our course that Dr. Barr and I have if anyone is interested. Just email lisa@waterlasetraining.com if you want to get the latest schedule, we will also be posting it in the calender section here shortly on this forum! Have a great weekend everyone!
Mark
2thlaserSpectatorHere are Larger photos of the above case. Glenn, having trouble mastering fotoslate, can you help?
Hope that’s better viewing!
Mark
(Edited by 2thlaser at 9:14 pm on Jan. 31, 2004)
Glenn van AsSpectatorMark : that is really cool……I think it is really neat how you managed that and I think that those kinds of cases are prefect for the laser.
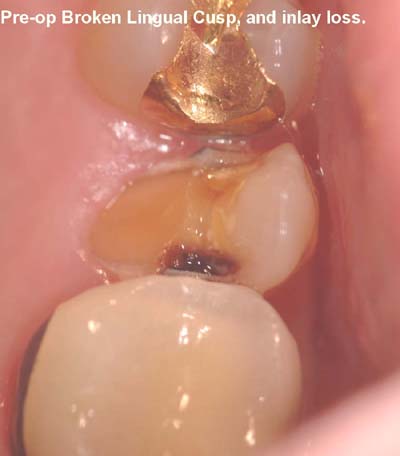
Broken cusp on premolar, healthy tissue for troughing, minimal decay…..
Nicely handled case. So many little things that you worked out from trial and error, kudos to you.
I think magnfication is really important here and in addition I think that we actually dont realize how much time the laser takes.
Yesterday I did a little six year old girl who needed two interproximal restorations done on her primary molars.
It took me about 22 mins to finish her up but when I looked back at the video tape it only took me 4 minutes for the preps, the rest was for the resins, placement and finishing.
I had it on tape and kept rewinding it wondering when the cutting was ………
Funny how we forget the time it takes.
Nice case Mark.
Glenn
AnonymousGuestQUOTEQuote: from 2thlaser on 12:21 pm on Jan. 31, 2004
RON SHALTER, who is one of my many mentors, for starting this for us all.Mark
An obvious referral to computer skills and how well you got those pictures lined up! Nice case, Mark.
2thlaserSpectatorRon,
You are a tattletale! Seriously, I blew it, them messaged you, then figured out how to edit the post, and voila! Thanks….but seriously, any comments on how to do this better? different? just curious.Mark
emc85Spectatormark
wow!
clean, clean case! every post keeps getting better and better. have you moved onto a scope now? cool, isn’t it?
what wattage setting or tip did you use for that?
ASISpectatorHi Mark,
You are very innovative and a laser purist in your work. Very nice presentation.
How do you smooth the buccal prep margin without risking any gingival ablation?
Andrew
AnonymousGuestQUOTEQuote: from 2thlaser on 9:31 pm on Jan. 31, 2004
….but seriously, any comments on how to do this better? different? just curious.Mark
Mark, I’m sure I can’t offer better and I also need some details to compare if different. So a few questions…
Any depth cuts on the buccal? When I tried this I did depth cuts on the labial and then prepped each section from cusp tip down.
Interproximally I prepped B to lingual and then ‘top down’ to try to parellel
Finally I tried to disect the periperal rim (top down)
like in my poor Photoshop drawing below.
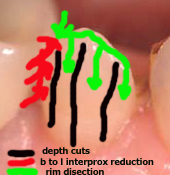
Is this what you’ve been doing?
Are my depth cuts what caused me so much smoothing work?
Did you have to smooth w/ hand instruments? I used your spoons alot but was ready to dig out a hachet or hoe (1st time I thought of those things in 20 some years).
Thanks for your help,
2thlaserSpectatorRon,
Here are my answers….I hope I can explain…”Any depth cuts on the buccal?” I don’t use depth cuts at all anymore, and yes, that is why you had some roughness. “When I tried this I did depth cuts on the labial and then prepped each section from cusp tip down.”You don’t need to do them, just dissect the peripheral rim of enamel from the dentin, angling the tip downward, and you will be surprised how smooth the prep will become! Similar to what you did to the interproximal.
“Interproximally I prepped B to lingual and then ‘top down’ to try to parellel “
Finally I tried to disect the periperal rim (top down) <—-that is the way to do it. I have never had to use anything but the laser, no hand instruments, no high or low speed, just laser. Remember too, that as you move the tip faster or slower, you can change your ablation rate, and thus the smoothness too. It's a bit frustrating at first, but when you learn how to do it, man, it's quick and easy. Then you find yourself using these techniques on regular operative procedures, really cool. Doing a crown prep has really helped me to understand the physics, and the actual physical part of using the laser. However, I warn everyone, seriously, use high magnification, especially doing the margins. Andrew asked about any collateral damage to the tissues upon margination…the answer is yes, sometimes if you don't power down to 1.25W or less, or move your handpiece too slowly, you can create too much energy, and then get some collateral tissue affect, although it's VERY minor, and you usually are troughing anyhow, so it really doesn't matter too much. Less is better for margination. Great questions, and really, this is a simple procedure. I have the video of how to do this now on our DVD that Bob Barr and I now have out. Let me know if any of you are interested. I can direct you to the website, as we get it online availability.Mark
Glenn van AsSpectatorNow Mark I grinned when you mentioned the following…
” Doing a crown prep has really helped me to understand the physics, and the actual physical part of using the laser”
What are the physics of how it cuts!!??
I am just poking fun at you of course. I applaud you for the efforts. I would never have stuck the course to work out what you have done. I saw Ben Ongs post on how to accomplish this and really had to look at what you were doing. Neat stuff. I still dont know whether I have the patience to do what you have done but I will say one thing, this most recent case was really neat.
Best one to do it on in my opinion is the premolar with a fractured cusp, minimal decay and alot of the prep done.
Having said that I really was intrigued by how you did it.
And I harken back to the days when I said it couldnt be done……Again I offer you my apologies…….I was proved wrong again.
Kudos to you for pushing the envelope….cool stuff.
Glenn
mickey franklSpectatorAmazing case!
How can we order the dvd?
Mickey
dkimmelSpectatorMark real nice. I don’t think that anyone would mind if you gave us the link to the DVD.
2thlaserSpectatorThanks David, and Mickey,
I found out that we had a bug in production, and are re-producing, so I will give the link, as soon as I know the product is ok…..thx.Mark
2thlaserSpectatorHere is another one I did today…
Preop….Large MFIL Restoration, patient wanted crown.
View after prep from Buccal…Used C-6 tip, varying from 4.0W-1.25W 50%air, 20%water…
View from Occlusal…
View of lingual shoulder….
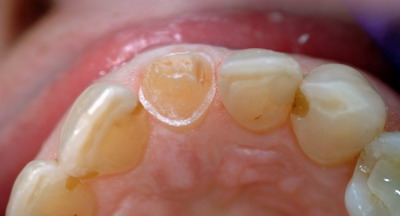
Going with either Procera, or Empress…Patient to decide.
Prep time approx 7 min…took more time because first time I prepped with C-6 throughout…and a bit more reduction due to rotation and trying to get enough reduced for esthetic result.
Mark
Lee AllenSpectatorMark,
I asked about the C tips in another post, but will repeat here since I see that you used it (them) for this gorgeous prep.
Do you find that they are faster?
You stated that you vary the wattage from 4.0 to 1.25W. Is the decision to change the W related to patient becoming uncomfortable, or is it the surface texture that you are trying to affect? ie: lower W for smoother surface. Or is it control for margin refinement and placement?
Nice case.
-
AuthorPosts