
Forums › Laser Treatment Tips and Techniques › Hard Tissue Procedures › First Crown Prep
- This topic is empty.
-
AuthorPosts
-
Graeme MilicichSpectatorFirst Crown Prep
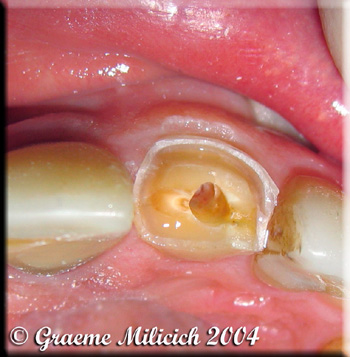
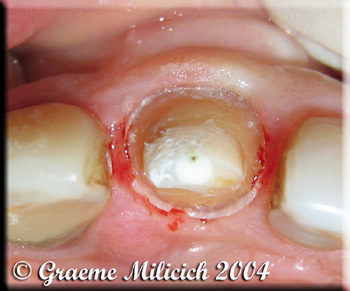
IMHO, the G6 tip (Waterlase) is the best tip for basic mapping out of a crown prep. It tends to cut hotter in the middle so creates a V shaped ablation groove. This is ideal for dissecting down the EDJ. The trick is to visualize the shape you want to prepare and then dissect the enamel off the tooth in one slice. The C6 tip (defocused) was used to refine the margins. The C6 tip has a smoother energy footprint, so has less tendency to create pits or grooves in the margin
This prep took a total of 12 minutes including all the photos.
One word of advice to anyone doing laser crown preps. Refine your enamel margins with a shoulder file or an enamel hatchet (or one of Mark’s curettes). Scrape back to smooth enamel.
Sorry about the name scribbled over all the images but I have discovered some of my images I have previously posted onto web forums being used in presentations with no acknowledgement
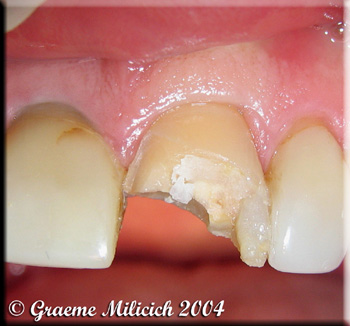
Here you can see how the labial enamel is being totally dissected off the face of the tooth by using the V shaped wedge that the G6 tip cuts. The focus of the G6 V shaped cut is at the EDJ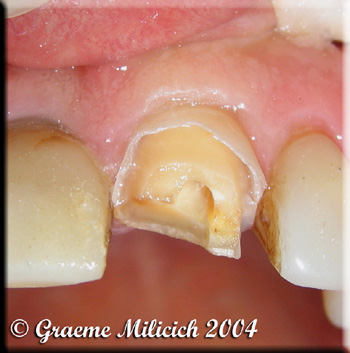
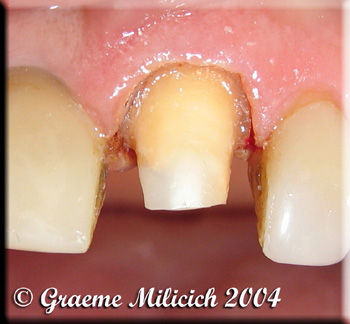
The basic prep is done and now the margin has to be refined using the C6 tip
The margin has yet to be finished with a shoulder file
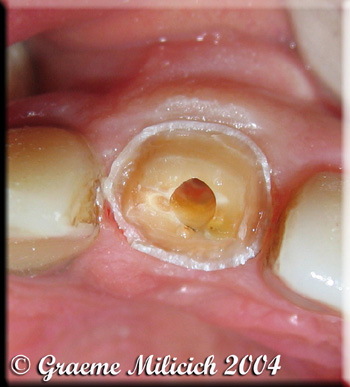
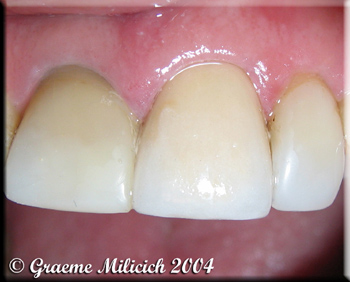
Completed preps
Final Crown
Once you understand how to use the tips effectively, this is not hard. This was my first attempt, but I have come to grips with how to make the laser cut properly (and efficiently) so this was simply an application of first principles.
Cheers
(Edited by Graeme Milicich at 12:16 pm on Nov. 1, 2004)
Lee AllenSpectatorBravo Graeme!
The photos are great, too.
I have a patient that wants the laser used always and needs a crown and veneer. What settings would you suggest?
And with the “spray” interproximal affecting the soft tissue, would you think it advisable to sheild the papilla with a bladed instrument?
My guess at settings is 5.5 Watts for the G-6 bulk reduction enamel and dentin, and 2.75 W for the marginal refinement with the C-6.
I get some dental charring over 3.5W which must be the high vacuum placed too close even with 30% Water?
Nice results.
Graeme MilicichSpectatorLee
You are right on with your settings.
You can use some sort of isolation if you so desire. I still tend to place cord if I have any issues. It only takes a few seconds.Re the charring of dentin. The issue here is one of energy density (which is altered by simply defocusing) The problem with dentin is it is made up of two components, hydroxyapatite and collagen. Each react differently to the same level of laser energy, and there si nothing we can do about the physics of this. I just ensure I finish off in a defocused mode.
Out of interest, the photos are taken with the ultracompact pocket Canon Ixus 500 (about as small as they get. I can operate it using one hand) Because it is so small, the flash is right beside the lens so you don’t get any shadows. I shoot in macro mode while sitting behind the patient. No fancy setup. Just point and squirt. The 5million pixel image then lets you crop it down to what you want, and still maintain good quality images
Cheers
2thlaserSpectatorHi Lee,
I am still in the Czech Republic, leaving to come home tomorrow. I would advise that once you get your margins to where you kind of want them, lower your power settings to 1.5W or less. Final marginal refinement should be done at .5-.75W, especially if you are using magnification, you will see that the C-6 tip will cut VERY VERY effectively at .5W. Sometimes I might even place my margins at that setting, but reduce the water to 15% or so, and air to 20% or so, depending on your visualization of your surgical area. I get home tomorrow night, and will be at work on Wednesday and Thursday before heading to Las Vegas for a Barr/Colonna training course, please feel free to call!
All the best,
Mark(Edited by 2thlaser at 7:05 pm on Nov. 1, 2004)
Glenn van AsSpectatorNeat case Graeme and yes the internet has its hosts of people intent on stealing ideas and photos as their own.
Graeme neat case and nice photos. I have found that all my laser preps have a V type notch. Is this not so for the Waterlase. I can show you cuts on root with a 400 micron tip which is easy to demonstrate. Have you noticed different shaped cuts with various tips.
Do smaller tips behave differently?
THanks for a neat case……
Glenn
Graeme MilicichSpectatorGlen
The Waterlase has got a new tip that has quite a different energy footprint that allows you to deal with certain phases of soft tissue and cavity preparation in a different way.
Some of the effects you can get with the C tip are quite cool
Cheers
Graeme MilicichSpectatorQUOTEQuote: from Glenn van As on 4:55 am on Nov. 2, 2004
Neat case Graeme and yes the internet has its hosts of people intent on stealing ideas and photos as their own.Graeme neat case and nice photos. I have found that all my laser preps have a V type notch. Is this not so for the Waterlase. I can show you cuts on root with a 400 micron tip which is easy to demonstrate. Have you noticed different shaped cuts with various tips.
Do smaller tips behave differently?
THanks for a neat case……
Glenn
Gleen
I posted another case that showed the adaptability of the C6 tip
http://www.rwebstudio.com/cgi-bin….start=0
You can tune how it cuts by focusing and defocusing, which changes the energy distribution pattern over the footprint of the beam as you move the tip in and out of focus
Cheers
Glenn on the roadSpectatorHi Graeme ……..I saw this case and thought it was neatly handled.
Is there a picture on the Biolase web site of the C6 tip….I am off to look at it.
I wonder if having 30 Hz makes a difference compared to 20 Hz for smoothness of cut (it does on my laser on both hard and soft tissue).
WHich begs another question is with the new MD by waterlase. What is the maximum Hz rate for hard tissue. IS it 50 Hz and then of course 160 mj for 8 watts or does the maximum Hz setting of 50 hz only apply for soft tissue where it will make a big difference in cutting smoothness ( I see this in varying between 10 Hz and 30 hz on my machine).
One issue with 50 hz for hard tissue is if the relaxation time between pulses is enough to continue doing the same amount of restorative work without anestetic.
I know that the pulse duration is short (good stuff) but I just wonder about that.
Graeme, I have worked with the 400 micron , 600 micron and chisel tips and even a soft tissue tip of 200 microns with flooding from a high speed syringe to cut preps. I have seen all of them cut a V notch especially in dentin.
I might try that and take a picture for everyone comparing the cuts at 5 – 10 seconds at high mag on cementum once I get back in the office. I can tell you the smaller tips cut far far faster but the shape of the cut was the same.
Off to see what the C 6 tip looks like.
Cya
Good stuff
Glenn
kellyjblodgettdmdSpectatorGraeme: great stuff! And to think, 5 years ago we didn’t think crowns could be done with lasers! Nice job raising the bar.
Kelly
Graeme MilicichSpectatorQUOTEQuote: from kellyjblodgettdmd on 8:18 am on Nov. 4, 2004
Graeme: great stuff! And to think, 5 years ago we didn’t think crowns could be done with lasers! Nice job raising the bar.Kelly
Mark raised the bar, we all followed in his footsteps.
Once you understand how to create smooth cuts with the laser, anything is possible with a bit of practice.
Cheers
Graeme MilicichSpectatorQUOTEQuote: from Glenn on the road on 7:09 am on Nov. 3, 2004One issue with 50 hz for hard tissue is if the relaxation time between pulses is enough to continue doing the same amount of restorative work without anestetic.
Cya
Good stuff
Glenn
Interesting thought.
Apparently (according to research conducted at Queensland University by Prof Lawrie Walsh) the A and C fibres have a natural frequency of 15-20Hz which is why a pulsed laser running at that frequency has the abliity to create analgesia (not anaesthesia).So in theory, a multiple of these frequencies might have a similar, greater or lesser effect.Not having a variable pulse laser, I can’t play with this to find out.
This will be up to all the lucky ones with the new MD laser to sort out.Cheers
2thlaserSpectatorI think we forget that as we increase the pulse rate, the depth of penetration decreases drastically. From what I have seen, at 50hz, one doesn’t get anywhere near the depth of cut you get at 30hz or below. I think that because of this, it IS just as easy to get and maintain good laser anesthesia, even at 50hz. Again, I have had the luxury of variable hz on my Waterlase for over 2 years now, and Graeme, I have been doing more at 15hz, per our conversation, with GREAT results so far, using far less power obviously. Just some observations…..again, tip selection is another VERY important consideration in this equation due to the energy pattern one needs to use to do their work.
Mark
-
AuthorPosts